Friday, January 21, 2011

Tu-tu Cute!

Hi everyone!  I Hope you are all surviving this cold, snowy winter we are having!  I am happy to announce that I have completed my first layout of the year and want to share it with you!  First off, I was so excited when I got a package in the mail yesterday!  It contained 4 Tim Holtz Distress Inks by Ranger, and a whole bunch of #8 tags.  I am proud to say that I now own all 36 colors of Distress Inks!  You will be able to tell on this layout that I put them to good use!


I want to say thank you to my cousin Karen for letting me use this adorable photo of her daughter Madelyn!  I distressed the photo with a sanding block, and my scrappy friend Lisa G put on the sweet fairy wings using her amazing talent with Photoshop! Thanks, Lisa!!


I purchased a new embossing folder in a damask pattern and used it on the bracket diecut that I made with white cardstock and inks!


For Christmas I got a Circut Lite cartridge called Botanicals and I just love the images on it.  I used the purple cone flowers and flower/butterfly in a large scale for this layout. I cut them out of white cardstock, and inked them with my Distress Inks.  I dribbled some water droplets on to the cut outs and it achieved this mottled,  water color look.  I stamped the flowers with a script stamp and embossing ink, then embossed Distress Embossing powder.  I absolutely love the effect it gave!  I tipped the ends with Tulip Puffy paint. 


I made circle from a corner punch by Martha Stewart and white cardstock, which I then inked with Antique Linen Distress Ink.  The title is made with Prima Flocked Alphas.


Here is a close up of the photo and the distressing.


I made this flower using Tim Holtz Tattered Floral die and used the butterfly punch from MS and a pearl flourish  for the butterfly trail.

I made the vine myself, as well as the pink flower the butterfly is sitting on.  I also got my sewing machine out again and did some curvy stitching on the background paper.  I used my MS doily punch around the edge of the Prima Fairy Flora pattern paper.


I used pop dots to raise up this flower/butterfly diecut to give it more dimension.

Thank you all for being so patient with me and not giving up on me. My health has been taking its toll on my mojo and my scrapping area is NOT working for me.  I am in the process of trying to get my new space  set up in the basement where I will have loads of room and my creativity will be able to bloom!   TTYL!!!!!

Happy Belated New Year!

Hi all!  First off I just want to say I am sorry that I have been MIA for so long.  We've had lots of craziness happening at home, and I've just haven't had the energy to be creative in any sense of the word!  My mojo is finally showing its face again, and I hope to share with you a layout that I have been laboring over.  I hope it will be worth the wait, and you will enjoy looking at all the different techniques I've used as much as I had in creating them!

Expect another update, hopefully tomorrow. Lord willing and the creek don't rise! Rest your eyes as they will be busy looking at all the details!!  Chow!

Tuesday, December 7, 2010

A home at last!

Hi everyone!  I want to share with you all something I made to store my many ink blending foams! Now I didn't come up with this idea,  my scrappy friend  Lisa made one of these first so I will give her the credit!  Take a look!


I used the cover of a book, and covered it with Basic Grey 's 'Green at Heart'.  I wanted my book to be colorful.  On my last layout I used a paper doily on it, and I had a few "practice" doilies left over and I thought it would be cool to use it on the cover as well.  I used a tape runner to tape all the paper down, and then gave it 2 generous  coats of Mod Podge, inside and out.  I knew that the book had great potential to get inked up [knowing me]and thought it would good to protect it.


Now, in my defense, I must say that I realize I put the foams on the 'wrong' side.  I am left handed and it is my time to rebel against society and mount them in a way that is comfortable for this lefty! lol!  I used 3 sheets of transiencies and put 9 foams with velcro circles per page.  I then made labels for each color [even the ones I don't have yet] all 36 of them!  I only need 5 more!!! 


If you look closely at the opening of the book you can see that the book doesn't close nice and flat. I needed a way to secure it so as not to wreck it going to crops etc.  I have this folder that I keep my sketches in and it is closed with an elastic that is attached to the back.  Seeing that got me thinking and looking, and sure enough, I found some elastic, colored it with Alcohol ink, attached the elastic with eyelets and TADA!  I now can close my book properly!


This is what the whole cover looks like from behind, and you can really see what the doily looks like.  I'm pretty proud of myself, venturing into uncharted waters for me!  Thanks for taking a look, and hopefully leave inspired to make a home for your foams too!

Thursday, December 2, 2010

Tried something new!


Friends


Hi everyone! Its hard to believe that its December already, but by looking outside at all the snow we have you'd think it was the end of January!  I've made a good start on my Christmas shopping, and for me, that is amazing!


I want to share this canvas I just finished with you all.  This is the first one I've ever done, so it was rather exciting for me!  I have a great friend who's 40th is coming up on the weekend so I thought it would be the perfect gift for her.


I got the canvas at the MCC store [thrift store] for .30 cents. Now that I look at the canvas,  I realize that I've used a number of the items on the canvas that I purchased at MCC!  The background is ripped up pages from a vintage book I bought there, and the fibers I've used as a border was also purchased there!


I made the Gerber daisies from cardstock and my Gypsy/Cricut and Picturesque cartridge.  I will be doing a tutorial on how I made them in the near future.  I used Tim Holtz  rusted grunge technique on the chipboard flourish.  I used Tim's flourish mask and a few of his distress inks on the background.


Thanks for taking a look, and thank you all for your support!

Thursday, November 18, 2010

Heaven Sent


Hi everyone! I'd like to share with you my latest l/o!  It is about my Great Niece, who was born 6 hrs after her Great Grandfather passed away.  He was my hubbies Dad.  It was a bittersweet day.  The Lord giveth and the Good Lord taketh away. Blessed be the Name of the Lord!

 For a long time now, I have been wanting to sew on a layout with my sewing machine.  I thought I would wait till my scrap room was set up in the basement, but since that doesn't seem to happening fast enough for my liking,  I took it out and plopped it on the kitchen table.  It had been years since I used that thing!  Once I got the kinks worked out and it sewing smoothly on a scrap piece of paper,  I took the the plunge and sewed!  I really like the way it adds to a layout!  I used some crocheted lace ribbon under the photo and accented it with pink rhinestones. 


I took a 10" white paper doily and inked it with Distress Inks. I used a flourish frame from Dusty Attics that I had gotten in one of my Swirlydoos kits and painted it with Antique Linen Distress Crackle Paint. I fussy cut the bird cage and the bird from some of my Webster's Pages paper, used my Heartfelt leaves stamp to make the leaves.  I used some green distress ink as water color, with a paint brush.  I created some curly tendrils with floral wire and tape.  I made the flowers from white card stock using the flower tutorial I posted earlier.


In the top left hand corner I used some silk flowers I collect from some of my mom's flower arrangements after she passed away.  Pink Paislee has these amazing embellishments called Artisan Elements, and I used 2 different pieces on my layout.  Here, I used one under the the flower cluster and inked it with distess ink in Broken China and Vintage Photo.


In the top right corner I used a mask from Prima. I sprayed re-positional adhesive on the back and placed it on the paper and then used Distress ink in Antique Linen , with my blending tool.  I placed white half pearls in the scallops of the doily. 


I had photo copied a part of the background paper where the butterfly was and used Rock Candy Distress Stickles on it, giving it a nice aged look. I then glued on the body part over the butterfly in the background paper and adjusted the wings so it looks 3 demensional.  I used another Artisan Elements ornaments and inked it in Aged Mahogany distress ink, and put the title in mini letters in the center.


Thank you for looking, and please leave a comment as I love to hear from you!

Monday, November 15, 2010

Flower Tutorial!!!

Hi everyone!  I've had some requests for a tutorial on some of my latest flowers,That I used on my 'Lean on Me' l/o, so I thought I would get on it!  First off, I want to say that these are not a "Bonnie original", and the idea for part of the flowers came for a good friend of mine from Swirlydoos by the name of Lisa Gregory.  You can find her here. She does amazing work and loves to share her ideas with everyone!


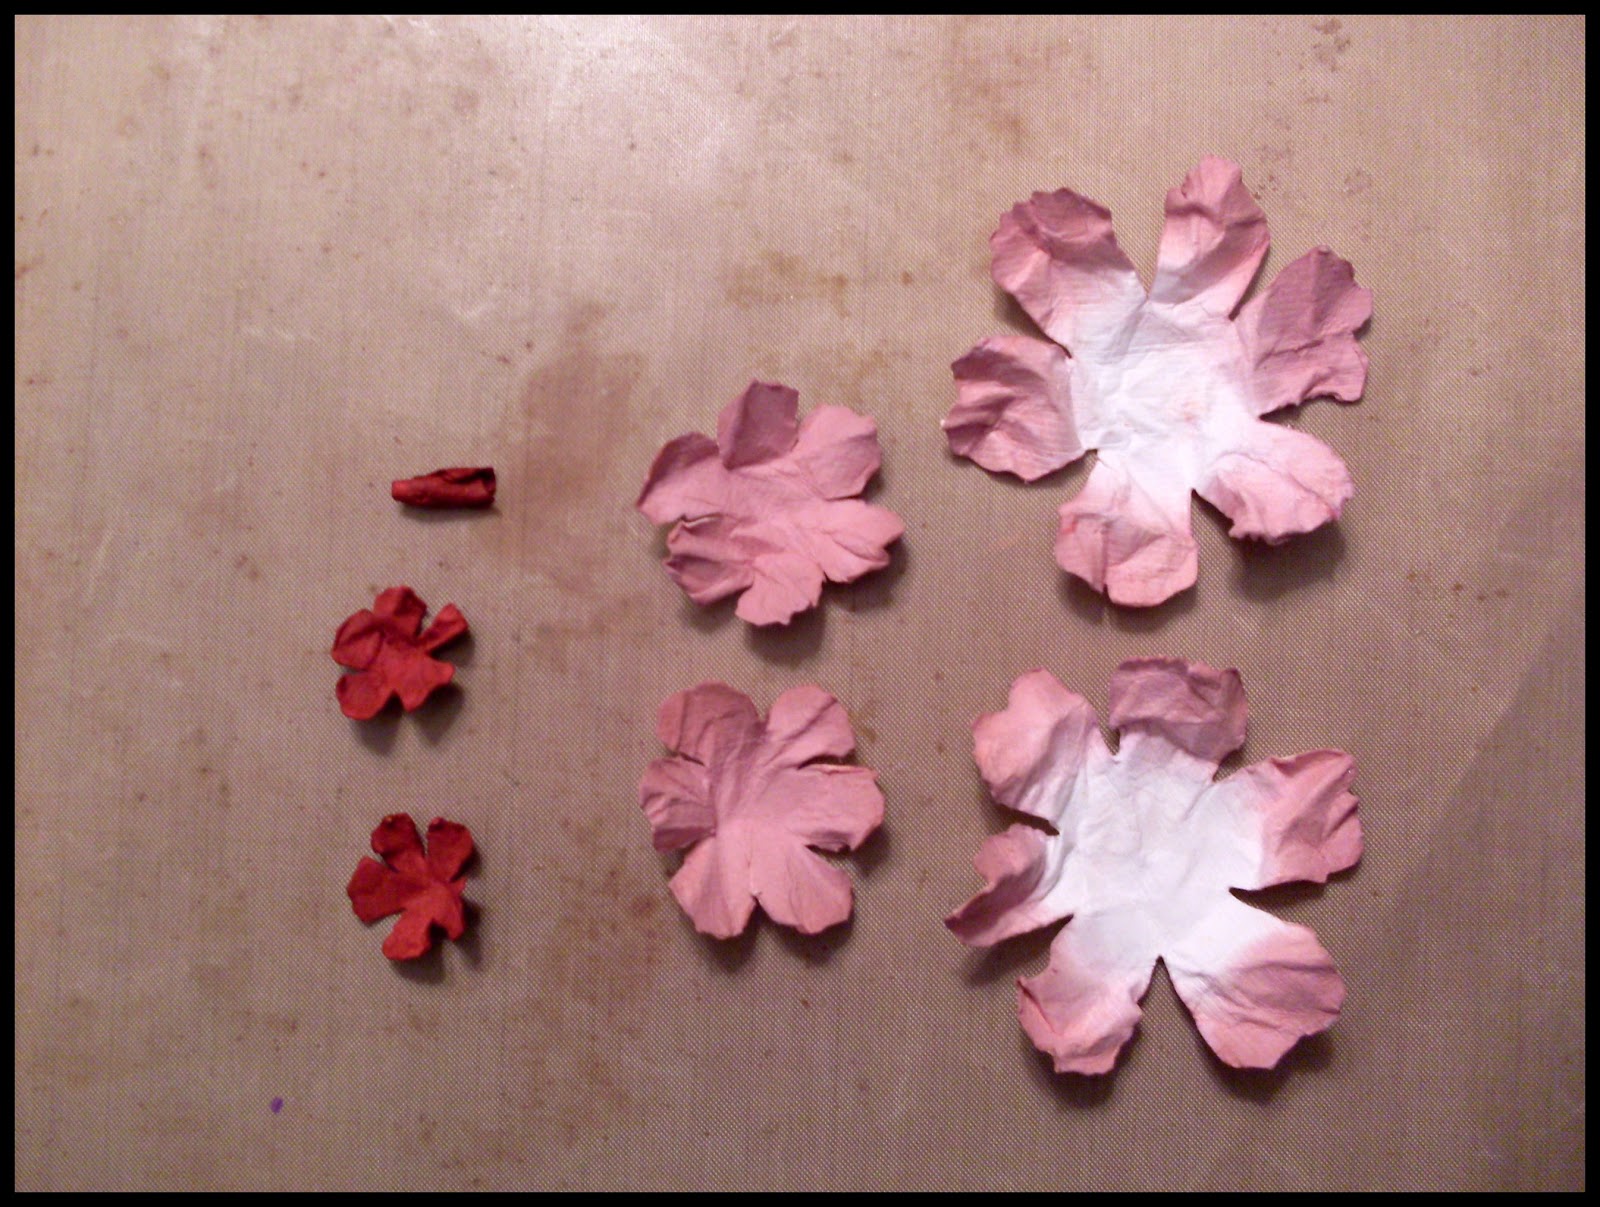
Here are the tools that I used, and can be substituted.  I used the Tim Holtz Tattered Floral Die, and cut 2 of large and medium, 3 for of the small, leaving out the flower with the long slender petals.  I used  2 colors of distress ink in the same color family, a blending tool, water, Zipdry glue and Tulip Puffy paint in white.  You also need a heat gun.  You could use glimmer mist in place of the ink and water.


I inked the larger petals along the outer edges, the medium petals totally with the same color.  For the 3 small petals I used a darker color.  The aim is to go from darker to light from the center out.


Next I spritzed the petals generously with water, as I am using a thicker cardstock.  The water softens the paper and makes the ink bleed for a softer look, but you must be gentle as the paper can rip.


Now I gently crumple up the petals and give them a bit of a twist, and hit them a bit with my heat gun.


Gently open the petals, leaving one closed up of the small ones, as this will be the center bud.  Take your heat gun and dry the petals.  Air drying works too, I'm just to impatient to see the results!


I like to assemble the flowers in separate layers ones they are dry, according to size.  Make sure you stagger the petals, and use your glue to glue them together.


Here is a close up of what the center flower looks like.  I put some glue in the folds of the center bud, and once it dries I snip the bottom off so it doesn't sit too tall.  Again, stagger the petals as you glue them together.


Now comes the fun part that sets these flowers apart!  You need white puffy paint and carefully put it along the edges of the petals


When that part is done the flower will look like this.  Let it dry for 10-15 minutes and then take your heat gun or blow dryer [haven't tried this] and heat up the flower.


This is what the finished product looks like after its puffed up and the edges have been hit with a bit of ink!  I just LOVE this technique!


Here are a few more flowers that I've done with this technique.  You imagination is your only limit on what you can do!  

I hope you have enjoyed this tutorial and that you find a passion for making these flowers the way I have!  Thanks for looking!


Sunday, November 7, 2010

My Little Sketch Book - 3rd times a charm!

Once again, I have been given the privilege to be Guest Designer over at My Little Sketch Book.  This is my 3rd and final layout for this year.


On this layout called 'lean on me',  I used left overs from one of my Swirlydoos kits.  The photo is of my sister and her best friends daughter.  I thought it was so cute I just had to scrap it, and I think it is one of my favs!  I love the way it turned out!
This is the sketch I had to work with, designed by Liz Qualman.  I really like it, as it is a simple sketch that has huge potential to be interpreted in unlimited ways. 

In this close up you can see the sugared letters I made.  I started with plain white letters, stamped them with black Stazon ink and a script stamp. Then I  used Diamond Glaze as an adhesive, and sprinkled Diamond Dust over the letters.  Once they were dry I then inked the edges with distress ink to give them more definition.  I also took a sanding block to the edges of my photo to distress them and then inked the edges with walnut stain distress ink to make it pop off the page.


I hand made these flowers using Tim Holtz's die called Tattered Florals.  I just got a new stamp from Heartfelt Creations called 'Leafy Swirls' that a lot of the girls over at Swirlydoos have been using.  I stamped it on green cardstock using a dark green distress ink and then fussy cut it out.  I then used the same ink on the edges to give more depth.


I used some of the bloomers I'd been hoarding from Websters Pages in place of plain ribbon below the title. 


In this photo, you can see the masking I did on the pink pattern paper I used for the base of my layout.  I used a new mask by Prima and distress ink.  I printed off some butterflies that Lisa Gregory from Swirlydoos is so kind to find for us and post on the forum.  I fussy cut them out, then used Distress Crackle Paint in Rock Candy, and once it was dry I rubbed some brown distress ink into the cracks.  You can also see on the brown cardstock and the inner pattern paper the water distressing I did to give it character.  I love that technique!


Here is another angle of the flowers I made with the leaves I stamped and cut out.

I hope you enjoy looking at this layout as much as I had making it, and please be sure to check out My Little Sketch Book, and leave some love for the other 2 designers as well!  Thank you my faithful followers!!!