Friday, July 29, 2011

Summer mini album blog hop!

Welcome!


         I hope you all are as excited as I am about our Mini Album Blog Hop that we have teamed up with Creative Cuts and More to share with you!  The hop will running starting now, till midnight July 31/11!
You should of arrived here from  Becky Voth's blog.


Now, I will be giving away a small prize to one lucky person!  All you have to do is leave me a super sweet comment, AND, if you aren't already, become one of my blog followers!  This will be my first give away so I am excited about it!


 This amazing blog candy has been sponsored  by Creative Cuts and More and, 
 for more information stop by SOUS after the hop.


The theme we were to use was 'summer', and I  chose to focus on butterflies and flowers! Both of which I love very much and use alot of in layouts!  I took part in a butterfly ATC swap about a year ago, and I used a few of the ones I received in my mini.  The first one is on the cover.


This close up is of the chipboard scalloped frame that I chose from Creative Cuts and More, and I used crackle paint, distress ink and finished it off with a rub on.


I chose this oval scalloped frame in white cardstock.  I used Smooch ink to color it and but the focus on the butterfly. 


Supplies used:
chipboard mini album:  Creative Cuts and More
Scalloped rectangle and oval frame:  Creative Cuts and More
pictures and images:  printed from the internet
pattern papers:  Prima Fairy Flora
embellishments:  all from my stash


Thank you again for stopping by and taking a look at my mini album, i hope it has inspired you to want to make one of your own....
                      
Your next stop will be

 Danielle Ryerson's  blog                      


and don't forget to leave some love...... :)


Wednesday, July 27, 2011

I'm so excited!

My Bloom layout was picked as Layout of the Week over at My Creative Scrapbook!  This is such an honor !  Thank you so very much!


Friday, July 22, 2011

Bloom Reveal Friday at SOUS!

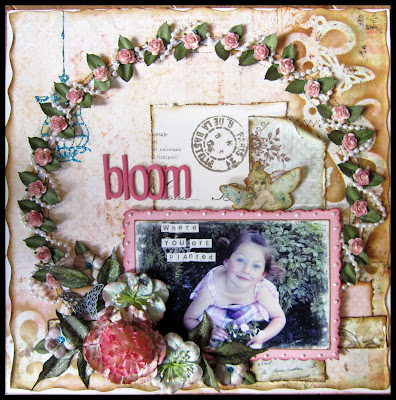
 YAY! It's Friday! I can't believe how fast the weeks fly by and summer is half over!  I can't believe my daughter is getting married in 2 weeks!  Today I want to share with you my take on the sketch that  our own Nanne Harry created for us on the Stuck on U Sketches  blog! Its a beauty!  My layout features my great niece Nila, sitting amongst the flowers. Her mom is the photographer of this sweet photo!


I used Pink Paislee's  Butterfly Garden pattern paper and did lots of inking, masking and distressing.


Here is the sketch created by Nanne.  Isn't it gorgeous?


I used some Prima flowers,  made the little ones with the blue center with my small retro flower punch, and the pink one is from Dollarama that I inked. Check out the metal butterfly I got from Wal-Mart nestled in the leaves!


I used some of my decorative scissors that hadn't been touched in a while to cut out the matting around the photo, and used some liquid pearls on it, and of course, inked the edges.  To make the bird cage on the paper stand out I used turquoise Stickles and outlined it.  I got some new Thickers the other day and used them on the main part of my title.


Here is a close up view of the flower cluster.  If you look closely at the pink flower you can see that I made a flower from and vintage book and placed it under the inked flower .  I had made these quite some time ago and am happy to finally put them to use! I'm loving all the dimension and layers! 


How do you like the fairy peeking out from behind the photo mat?  I fussy cut her out of the paper and inked the edges and put a bit of Stickles on her wings.  I stamped the floral image  above her head.  The stamp is part of the Butterfly Garden collection.


This is a close up look at the rose/pearl strand circle I made.  The roses are from I am Roses, that were white to start with, and I inked them with Worn Lipstick distress ink.  I used my MS leaf punch and glued the roses and leaves around the machine stitched circle I had made prior.  Now I knew it need one more thing, so I got my stash of pearl string that I got at my local thrift store and  wove it in and out of the roses.  Love it!


  I want to remind you of the blog candy that is being given away this month.   Plus, the mini album blog hop is just around the corner!  Its going to be so exciting!  My first blog hop!  Thank you all for coming to look at my work.  You will never know how much your words of encouragement mean to me!  I just love sharing the things I learn with everyone!   I can't wait to see what you girls do with the sketch!

Friday, July 8, 2011

Cherished is a daughter - Stuck on U Sketches!


Is it really Friday already?  I love reveal Friday at Stuck on U Sketches!  I can't wait to share with you the sketch we got to work with this week!  It is an original by Nanne herself!  This one came really easy for me, and everything just seemed to flow right.  Gotta love that when that happens! I finally got my hands on Pink Paislee's Butterfly Garden Paper Collection and I am in love!  These papers are so gorgeous, and the paper collection contained 4 sheets of each design!  Yes! 4!


This gorgeous girl is my daughter who is getting married on August 6/11.  This photo was taken during a engagement photo shoot with Cheryl Wolfe Photography., who happens to be my sister!  There will be more layouts from the engagements photos to follow.


Here is the sketch that Nanne did, and I kept pretty true to the design. Why mess with a good thing?


I did a whole lot of fussy cutting, and the 2 butterflies are part of that.  I covered them with Rock Candy Distress Stickles and layered them once they were dry.  I used pop dots under the wings to help them stay in the position I wanted them to be in.  I used a strand of pearls for the butterfly trail.


For the title I used white Thickers and slightly overlapped them, and I also used MM mini alphas.  I used my sewing machine to add the gorgeous detail of the stitching. Through out the layout you will see areas where I have used touches of white Puffy Paint.  Love that touch!


I used a Dusty Attic piece that I painted with Gesso, then Rock Candy Distress Paint, and finally a touch of Tea Dye Distress ink.  I hand made the flower, adding many touches to add character.  The leaves were made with a stamp from Heartfelt Creations.  I inked it, cut it out, shaped it and glued it in place.


Here you can see the dimension of the little roses tucked under the fussy cut flower, and the touches of stickles I used. 


I cut the brown flourish on my Cricut/Gypsy, inked it and then embossed it with Walnut Stain Distress Embossing powder.  Don't forget to rub it once its cool to get rid of the release crystals and discard them!  More touches of Stickles on the butterfly and to highlight the roses in the pattern paper. 


In this photo I wanted to show you the dimension of the butterfly and its pearl trail as it loops around the flowers. 


Please head on over to Stuck on U Sketches to see what the rest of the design team has come up with, and take a look at the goodies you could win if you participate in the 2 sketch challenges!

Friday, July 1, 2011

Looped Flower Tutorial!

Good Morning! I'm here today to share with you all what I call the looped flower that I made on my last layout for SOUS!
Supply list

Mother's Day Bouquet Cartridge
2 - 2 " loop flower
2 - 1 3/4" loop flower
2 - 1 1/2" loop flower
button or center of your choice
embroidery floss
adhesive
Glimmermist
distress ink
blending tool
foam pad
stylus or paint brush
scissor


 I used Aged Mahogany to ink the edges of my flowers.


Take each flower individually and press the stylus into the flower following the shape of the flower on the top side[ on your foam mat] This will give it a cupped look.


Take your Glimmermist and lightly mist the flowers, I used a clear pearl color just for some glimmer.


Start gluing your flower together starting with the largest to smallest, staggering the petals.


Take your embroidery floss of thread and tie it to the button.  I  used embroidery floss, not separating the threads until after I tied it.  I gives it a fun look.


Take your adhesive and glue the button onto the top of your flower.  You can leave it like this, as I did on my latest layout "Shh..." OR


You can take a squire and roll the edges of each petal down for a more polished look. Ta DA!  You are now done!  Pretty easy, eh?  The flower is limited only to your imagination.  Thanks for joining me today!  I hope you all give this flower a try and use it on your next layouts!