- Zipper Flower tutorial


Supplies needed:
Scissors button or pearl embellishment for flower center.
Needle
Thread
Zipper- size varies on the size of flower you want to make. This zipper is approx 26”. The metal teeth zippers work the best as they are stiffer, but the nylon ones work as well for smaller or less structured looking flowers.

Cut the Top Stop and the Bottom Stop off the zipper and slide off the zipper Pull, separating the zipper into 2 parts. Set aside on half for a different project.

Keep in mind that I am left handed, so, if you are right handed you will probably be folding your zipper the opposite direction.
Take one end of the zipper in your hand and make a loop/petal, making sure that the teeth of the zipper is always on the outside of the loop. The size of the loop will depend on how big you want your entire flower to be, and the length of your zipper. Take your needle and thread [double for added strength] and come up from underneath through all layers and back down to secure.

Continue making loops/petals and securing until you have completed 5 loops.


This is what it should look like when all five petals are done. You should have a tail of zipper left over that is approximately 4 inches long.

Now take the remaining zipper and from the open end, roll it up like shown in the photo and set it into the middle of the loops/petals.

Take your needle up through the bottom of flower and through the side of the rolled up center and out the other side, and back down to the underside of the flower. Do this several times to secure.
Now you have completed the main structure of the flower and you can leave as is, or embellish it the way you like!

Here are some that I made, and embellished. The flower I made for my layout “simple pleasures” is embellished with lace, Diamond Dust on the teeth, and glittered pearls for the center. This Tutorial is for sharing and everyone to try! If you make one, I'd sure like to see it!

Here is the list of supplies I use:
distress ink
blending tool
crafting tweezers
heat tool
adheasive
water
any kind of shimmering spray
small retro punch for mini rose
2 -5 petal flowers at size of your preference. I used my cricut/gypsy, cartridge Wandering gypsy
2.44 in/width, 2.38 in/hieght
1-5 petal flower approx one inch smaller than the 2 larger. I used the same flower at 1.48 in/width, 1.44 in/height.
5 small retro flowers for the mini rose for center


I used this butterfly on my latest page called "Lil Cowgirl". I added some pearls for the body and a piece of Prima pearl flourish for the trail!

Supplies needed: white die cut butterfly,[I used my Martha Stewart punch] Vintage Photo distress stain/ink, Aged Mahogany Distress Embossing Powder, Distress Embossing Ink, tray or paper, tweezers, heat resistant mat, and heat gun.


Cover the butterflies first with the Embossing Ink, then place in the tray and cover generously with the Embossing powder. Make sure you shake the Distress embossing powder first to distribute the release crystals evenly before you apply to the butterflies.

lightly tap off the excess embossing powder from the butterflies. Hold the butterfly with your tweezers so you don't burn yourself. Heat the embossing powder till it darkens and takes on a very light sheen. You can't burn this stuff, so don't be scared to heat it good!

Let the butterfly cool and then with your finger gently rub the butterfly to release the crystals that are supposed to be removed, giving it that distressed look.

If you want, you can add more Vintage Photo on top of the distress powder. I did for these particular butterflies as I felt I hadn't put enough the first time. There you go! You now have Rusty Butterflies!! I really like how the Aged Mahogany Distress Powder gives it a deeper, richer color!
Let me know if you use this technique as I would love to see you use it! Obviously it works for much more than butterflies. I see it being used for keys, locks, hinges and even flowers! Thanks for stopping by!
Hugs,
Twisted Camelot Flower Tutorial
This is my version of the Camelot Doop tutorial I found on Youtube by Jadedstudios.

distress ink
blending tool
crafting tweezers
heat tool
adheasive
water
any kind of shimmering spray
small retro punch for mini rose
2 -5 petal flowers at size of your preference. I used my cricut/gypsy, cartridge Wandering gypsy
2.44 in/width, 2.38 in/hieght
1-5 petal flower approx one inch smaller than the 2 larger. I used the same flower at 1.48 in/width, 1.44 in/height.
5 small retro flowers for the mini rose for center

I like to ink all the edges first with distress ink with my blending tool, and on the 5 retro flowers I do the backs as well.

I then spritz with water and the ink bleeds, giving it a soft blended look. Then blot of excess water.

Next, take your tweezers and twist each petal in the same direction.

It should look something like this.

Here comes my little twist that makes them abit different. With both hands I use 2 fingers and push the flower towards the center and give it a little twist. If the petals tear a bit, its not a problem as you don't see it anyways.
Then it looks like this! Now take your heat tool and dry it.

Do this to all three flowers.

I then make the mini rose, following which ever tutorial you choose, or using a Primi mini rose, inked, and remove the leaves.

I then spritz them all with a Shimmer mist. On this flower I used Smooch Spritz in Spun Sugar. Dry with your heat tool.

I then assemble, alternating the petals and glue down with either Zip Dry adhesive or the glue gun. This is the finished product!
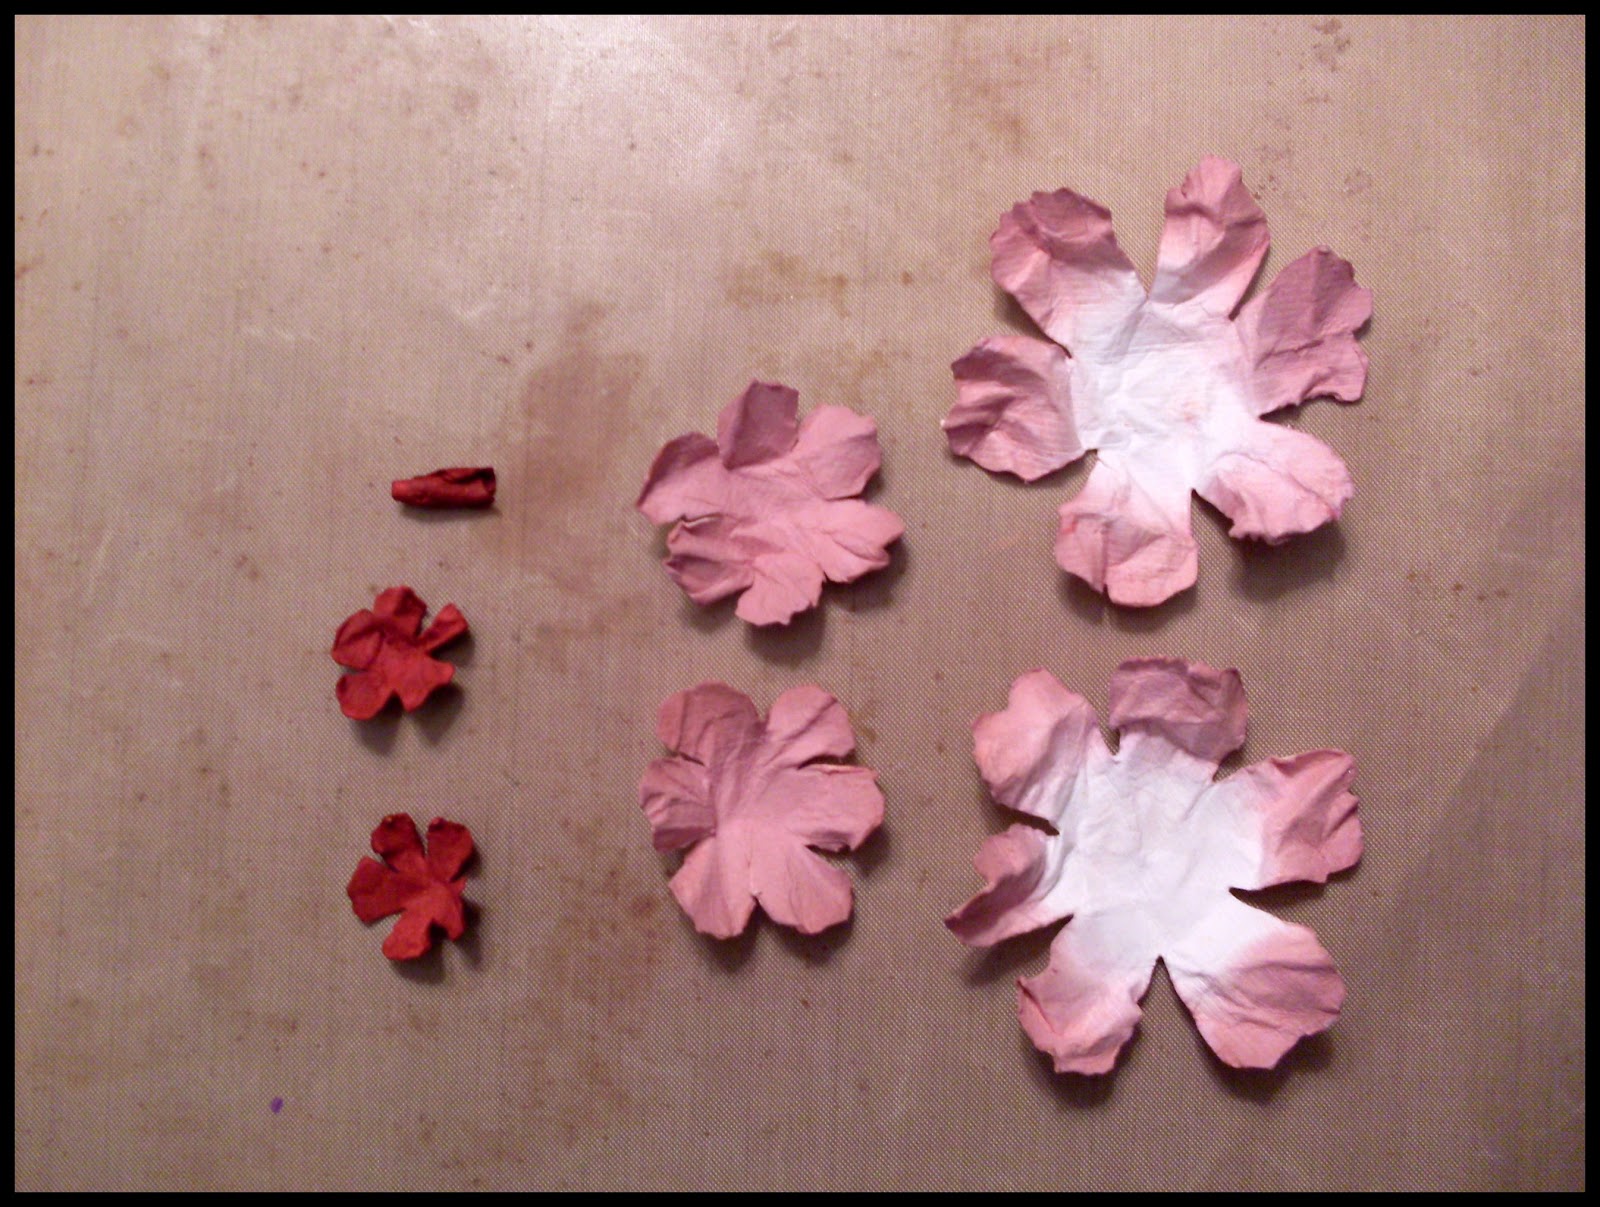
Flower Tutorial

Here are the tools that I used, and can be substituted. I used the Tim Holtz Tattered Floral Die, and cut 2 of large and medium, 3 for of the small, leaving out the flower with the long slender petals. I used 2 colors of distress ink in the same color family, a blending tool, water, Zipdry glue and Tulip Puffy paint in white. You also need a heat gun. You could use glimmer mist in place of the ink and water.

I inked the larger petals along the outer edges, the medium petals totally with the same color. For the 3 small petals I used a darker color. The aim is to go from darker to light from the center out.

Next I spritzed the petals generously with water, as I am using a thicker cardstock. The water softens the paper and makes the ink bleed for a softer look, but you must be gentle as the paper can rip.

Now I gently crumple up the petals and give them a bit of a twist, and hit them a bit with my heat gun.
Gently open the petals, leaving one closed up of the small ones, as this will be the center bud. Take your heat gun and dry the petals. Air drying works too, I'm just to impatient to see the results!

I like to assemble the flowers in separate layers ones they are dry, according to size. Make sure you stagger the petals, and use your glue to glue them together.

Here is a close up of what the center flower looks like. I put some glue in the folds of the center bud, and once it dries I snip the bottom off so it doesn't sit too tall. Again, stagger the petals as you glue them together.

Now comes the fun part that sets these flowers apart! You need white puffy paint and carefully put it along the edges of the petals

When that part is done the flower will look like this. Let it dry for 10-15 minutes and then take your heat gun or blow dryer [haven't tried this] and heat up the flower.

This is what the finished product looks like after its puffed up and the edges have been hit with a bit of ink! I just LOVE this technique!

Here are a few more flowers that I've done with this technique. You imagination is your only limit on what you can do!
I hope you have enjoyed this tutorial and that you find a passion for making these flowers the way I have! Thanks for looking!
Looped Flower Tutorial

Supply list
Mother's Day Bouquet Cartridge
2 - 2 " loop flower
2 - 1 3/4" loop flower
2 - 1 1/2" loop flower
button or center of your choice
embroidery floss
adhesive
Glimmermist
distress ink
blending tool
foam pad
stylus or paint brush
scissor

I used Aged Mahogany to ink the edges of my flowers.

Take each flower individually and press the stylus into the flower following the shape of the flower on the top side[ on your foam mat] This will give it a cupped look.

Take your Glimmermist and lightly mist the flowers, I used a clear pearl color just for some glimmer.

Start gluing your flower together starting with the largest to smallest, staggering the petals.

Take your embroidery floss of thread and tie it to the button. I used embroidery floss, not separating the threads until after I tied it. I gives it a fun look.

Take your adhesive and glue the button onto the top of your flower. You can leave it like this, as I did on my latest layout "Shh..." OR

You can take a squire and roll the edges of each petal down for a more polished look. Ta DA! You are now done! Pretty easy, eh? The flower is limited only to your imagination. Thanks for joining me today! I hope you all give this flower a try and use it on your next layouts!
Rusty Butterflies


Apply a light to medium coat of the Vintage Photo to your butterflies.

Cover the butterflies first with the Embossing Ink, then place in the tray and cover generously with the Embossing powder. Make sure you shake the Distress embossing powder first to distribute the release crystals evenly before you apply to the butterflies.

lightly tap off the excess embossing powder from the butterflies. Hold the butterfly with your tweezers so you don't burn yourself. Heat the embossing powder till it darkens and takes on a very light sheen. You can't burn this stuff, so don't be scared to heat it good!


If you want, you can add more Vintage Photo on top of the distress powder. I did for these particular butterflies as I felt I hadn't put enough the first time. There you go! You now have Rusty Butterflies!! I really like how the Aged Mahogany Distress Powder gives it a deeper, richer color!
Let me know if you use this technique as I would love to see you use it! Obviously it works for much more than butterflies. I see it being used for keys, locks, hinges and even flowers! Thanks for stopping by!
Hugs,
Hi Bonnie I love your new look blog and your tutorials. I Love the zip flower and will def give this a go. I will let you know how I get on. Thanks for sharing, bye for now. x
ReplyDeleteLoved all your flowers. Have pinned it here:Flower making Tutorials with link back to your post
ReplyDelete