Monday, March 19, 2012

~Me~ and some good news!

Hello to everyone! Today I want to share with you this layout I made for no reason other than I wanted too! This is a photo of myself when I was 6 months old. I had to do some "clean up" on the photo using PSE as there were some stains and some not so pleasant signs of age. I have very few photos of me as a baby, so when I came across this one I knew it was a scrapper.

I used my Feb Limited Edition kit from My Creative Scrapbook. It has so many gorgeous goodies in it! A few items were from my own stash. Below are some close ups.


I have to share with you what I did on the upper left corner here.  I used one of Prima's new stencils and some Moulding Paste, and I just love the design! I used some distress inks in a few areas to make it more visible.

The butterfly was made with a steel die from Memory Box, and they are really cool and easy to use.
These pink spiral flowers are made form a die from Memory Box  as well. The 3 flowers with the pearls are from Prima and I altered them with Tattered Angel Glimmer Glam and some distress inks.


Thank you all for stopping by and taking a look!  I had so much fun putting this layout together...... its so good to have my mojo slowly returning! Please leave a comment!

Now for my good news!  I will be rejoining the group of amazingly talented ladies at Stuck on U  Sketches in April and I am so glad about it! So keep your eyes peeled come April for some SOUS work coming from me!

Friday, March 2, 2012

100% all boy ~ Prima Sketch Challenge with My Creative Sketch!

I LOVE Prima products!  How about you? If you do, head on over to My Creative Sketch and check out the sketch challenge they are having! I used my February Limited Edition kit from My Creative Scrapbook for my entry to the contest. This kit is so full of beautiful papers and embellishments I had a hard time cutting into them!

I cam across this photo of my dear hubby when he was about 6 yrs old and just knew I had to scrap it!  I don't do alot of masculine pages, so I have to challenge myself at times!  He is so cute here, and I am happy to announce that he has since grown into his ears! lol  Shhhhh!


 I needed to do a bit of work restoring the photo, but I think I did an ok job considering I am very new to that! Lots of edge distressing happened here with my Zutter Distrezz-it-all, and inked edges with Vintage Photo Distress Ink!


This is the sketch you will find at My Creative Sketch, created by Kim Keane. She makes amazing sketches!  Thanks, Kim!


I actually used a bunch of my stash of embellishments here. The cogs and chicken wire are from Dusty Attic, and I used my Rusty Butterfly technique on them, and the flower I made from the Tattered Floral die from Tim Holtz and a printed paper bag. The rub-ons are from the kit.


I fussy cut the bicycle out of the paper and inked the edges and topped it with Rock Candy Distress Stickles from Ranger, then popped them up with pop dots.


Here you can see the masking I did with a Tim Holtz mask, and a close up of one of the rub-ons.

 I fussy cut the bird and used Rock Candy Distress Crackle paint on it, then used Helmar's Liquid pop dots for dimension.

Thank you all so much for stopping by, please leave a comment so I know you haven't forgotten about me!  Hugs!

tile coasters

Hey! I want to share this easy project with you!  I wanted to make some new coasters for myself as the ones we have are very light and when you have a sweaty cup sitting on it, it sticks to the cup when you lift it up!  ANNOYING!!!   So this is what I came up with.

I bought some 4x4 white ceramic tiles from Rona for about $.40/pce.  I bought a kit of surface protectors [ cork, rubber and felt] to put under the tiles.  The "real" size of these tiles were more like 4 1/4" x 4 1/4", so I cut my paper into 4x4 pieces.  I used less then one  12x12 piece of paper for six coasters!

I used a matte medium by Ranger to adhere the paper to the tile in THIN coats of the glue so the paper doesn't pucker and get glue trapped underneath.  I then applied 2 more coats of the matte medium on top of the paper, drying between each coat.

To seal off the tiles I sprayed 2-3 coats of a matte moisture proof protector on top, following the directions on the can.  Then enjoy! Its as simple as that!  Let me know if you give it a try!  Thanks for stopping by!

Altered book mail holder

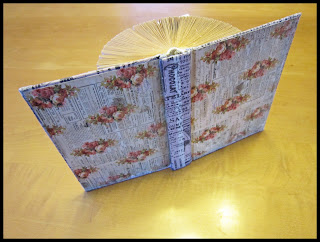
Hi everyone! Sorry my blog was messed up for so long..... I had been viewing it on my Ipad the last few months and things looked normal on there!  I got it all fixed up and ready for action!  I want to share with you something I saw on a DIY show.  It is an altered book mail holder!  I KNEW there must be a way to store your letters and receipts in a way that looks good!


I started with a hard cover book about the size of a paperback novel. The other items needed are pattern paper, tissue tape and Mod Podge or Matte Medium and a brush.


The first thing you need to do is fold each individual page in half, tucking tightly into center seam of the book, use your fingers or a bone folder to make a sharp crease.


Using your tissue tape, cover the spine of the book, and all the other edges.


Now take your pre-cut pattern paper [mine was approx 4 x 6 inches]  adhere the paper to the inside and outside cover. I wanted the tissue tape exposed so this is how I did it, but use your imagination and do what you like.  Easy Peasy!

p.s. I added 2 coats of Matte Medium over top of the paper and the tissue tape!

Thursday, March 1, 2012

Our love.....

Hello my friends! Yes, I assure you, that it is really me!  I know I have been MIA for some time and I apologize for that.  I am slowly getting my mojo back, slowly.  I've been getting the Limited Edition kid from My Creative Scrapbook since November and they have been gorgeous! This layout is not from a sketch, just something I put together on my own.  It is a wedding photo of my dear hubby and me, and I used the November kit.

                                             
                                                                   Here are some close ups!


Thanks for stopping buy , and I hope you enjoyed the layout!  Stay tuned for more!