Monday, December 19, 2011

Time for a break

Hello my friends! I just wanted to take some time to tell you that I am taking a short break from scrapbooking and my commitment to my design team. Life has gotten a bit overwhelming for me lately and I am having creative block. I need to get my focus back in the right place. I am so thankful for such understanding "bosses" and the support they give! I love designing for SOUS!

My wish for you all is to have a Blessed Christmas, and to remember the true meaning of Christmas. I hope to see you in Feburary over flowing with new mojo and totally refreshed, creatively speaking!


Thursday, December 8, 2011

This Dress ~Stuck on U Sketches!~

Happy December!  Its so hard to believe that Christmas is right around the corner!  I hope you all are more prepared then I am!  I need to pull up my boot straps and get down to business!  Today's sketch is provided to us by our own talented Sandi Clarkson specifically for SOUS!  I used some older Bo Bunny winter paper that I had been hoarding for a while.  The little girl in the photo is my own daughter, Jerica, at the age of 18 months.  The story behind this layout is about the dress she is wearing. I made this dress for her using my High School graduation dress.  I am not a seamstress by any means, but had done some sewing here and there.

To make the circle I used a circle chippie by Dusty Attic and used white crackle paint and then rubbed in a bit of Seedless Preserves Distress Ink from Tim Holt'z fall seasonal series.  I really like this purple!  I stamped on the circle with a script stamp and Black Archival ink. I punched some holes in the circle with my Crop-a-dile and threaded some plum  tulle  through the holes, finishing off with a little flower.


Here is the sketch by Sandi!


For the edges of the photo I stippled a thick textured paste with a paint brush to simulate snow.


In  this flower cluster I used some Prima blooms, and some little white roses from I am Roses, and the 2 pinkish flowers I made using Tim Holtz Tattered Floral die.  

I used some Thickers for the tittle, and the journaling reads" I had so much fun taking apart my grad dress and sewing 'This Dress' for my sweet little girl!"


I used a Prima flourish with bits of lace attached to it, cutting it up to get more 'bang for my buck'!

Thanks so much for stopping by!  I hope you enjoyed this layout as much as I enjoyed making it.  Please stop by Stuck on U Sketches and check out what the other girls have done with the sketch and please join in!

Have a  safe happy weekend, everyone!
Hugs,

Thursday, November 24, 2011

Enjoy the Moments... Reveal Friday!!

First off, I'd like to wish all my American people a Happy Thanksgiving!!  We Canadians had ours last month so we are now gearing up for Christmas. Welcome to reveal day at Stuck on U Sketches! This weeks sketch is brought to us by Pagemaps. I used the color palette from The Color Room, Palette # 85, but didn't have my time zones accurate so I am too late to enter it.  How sad am I!

So! I will introduce to you, "Enjoy the moments"! This layout features my daughter and son-in-law on their wedding day!


This layout is brimming with techniques, and a few of them new for me.  I used Websters' Pages Trendsetter paper collection


Here is the cute sketch we got to work with. My layout seemed to take on a life of its own, but if you look closely you will see some resemblance!


I used Prima's brick wall stencil together with texture paste, and then inked over it with distress inks.  I love how it blended into the background of the photo!


I took advantage of the existing window ledge in the photo to add my Prima resin window on to. I made a whole bunch of rolled flowers..... they are addicting after a while!  On some of them I used Clearsnap Glue Gloss by Donna Salazar  as well as some of her Fairydust glitter!  I love them both!  I also used a Dusty Attic vine that I inked with distress stains and used stickles over top.  I tried something new that I saw Gerry Van Gent do, called an inverted scalloped circle. She is one talented lady!


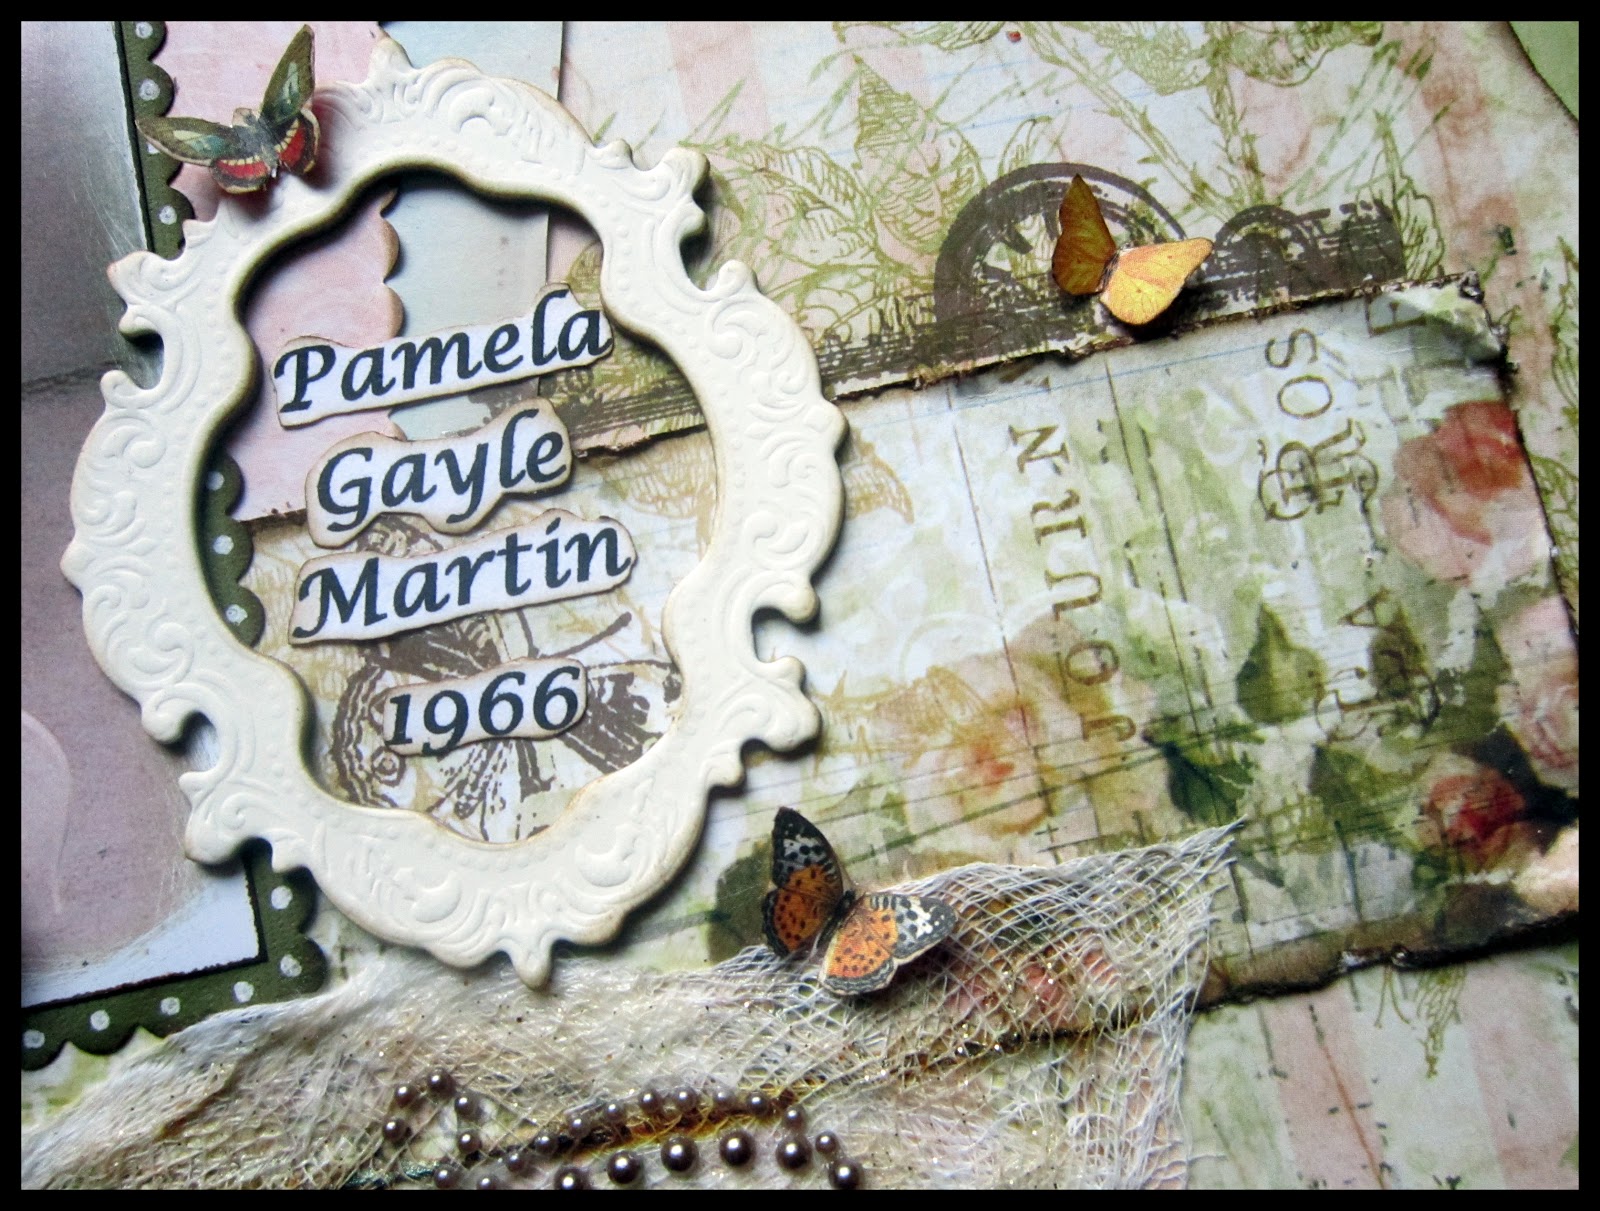
I used a Dusty Attic Phrase for my tittle and I first used Picket Fence Distress stain so I could have a white "canvas" if you will, so my color of ink would be more true and so I could vary the intensity of the raspberry ink.  I love how it turned out! 


Here is a close up of my main flower cluster.  I used  a Prima  flower for my main flower and surrounded it with some more rolled flowers I made, and some Websters' blooms.


I also used some I am Roses leaves, and mini roses that I colorized for the color palette I was using.


So that's it for today! Thank you for stopping by! Please go to the Stuck on U Sketches blog and check out what the other girls designed for your viewing pleasure!  Have a good weekend and stay safe!

Monday, November 14, 2011

~Adorable~ My Creative Sketches Challenge- Sketch #2

Happy Monday everyone!  I hope you all had a delightful weekend! Today I want to share with you a layout I made for My Creative Sketches.  They are running a Big Sketch Contest and this is based on Sketch #2.  The prizes that you can win are to die for!  Make sure you check it out! 


The feature on my layout is the photo of my sister-in-law when she was 2 yrs old.  I saw this photo  the last time we were visiting and I knew it was a photo I really wanted to scrap.  I was so happy when she gave me the go ahead to use it!  The first thing I did was add a touch of pink to the flowers and the bow in her hair.  I used a q-tip with distress ink.  I used Pink Paislee's Butterfly Garden

This is  sketch #2, and it is made by Kim Keane. Its a gorgeous sketch to work with and has many possibilities!  I flipped it to work better with my photo.


Thursday, November 10, 2011

*Drool Worthy* @ SOUS!


Welcome fellow scrappers, bloggers and lovers of all things beautiful and crafty! It is Reveal Friday at Stuck on U Sketches! Today's sketch is brought to us by our own lovely and talented Nanne! I snagged some really cute photos of my Great Niece Lucia Tait off of Facebook a while back and now was the time to use them.  Let me introduce you to "Drool Worthy"!


For this sketch I decided to flip it to work with my photos better.  I used papers from Websters "ladies & Gentlemen" collection.  I really like the colors of this collection.


Here is the sketch provided to us by Nanne from Nanne's Creations.


Just the other day I bought a number of packages of these really cute Prima Alphas that are made of canvas and are small. Yummy!  I used Crystal Stickles  to outline the title.


The larger fabric flowers are Prima flowers, the roses and leaves from I am Roses, and the small dark pink are Petaloo.  The resin bird is Prima. I used a black marker and doodled around the outer edges.


I used a layer of a Dusty Attic scroll frame that has two parts.  This is the bottom layer that didn't have any details.  I used an idea that I got from Gabi Pollacco that she put on the Dusty Attic website. It is about giving your chipboard a 3-D look, but I will tell you, her's is much better than mine! lol.  I used Liquid Pearls to draw on my dimension  and once that was dry I painted over everything with white paint.  Then I took some Glimmer Mist in Dragonfly, I believe, and painted it on with a paint brush.  I then added a second layer in a green and brushed it on and let it pool in the grooves and dried it with my heat tool.  I accented the dimension with crystal Stickles.


If you look closely at this photo you will see Lucia's chin wet with drool, and hence where I got my title for this layout!  A little play on words.


I used a paper doily for the circle and I painted the flowers, leaves and background with Distress Inks/Stains and a paint brush.  The little white bird house is from Prima's resin collection. 


Just a close up of the flower cluster in the upper right hand corner.

Thank you so much for dropping by so I could share my layout with you.  Its always a pleasure to share my passion with others!  Don't forget to stop by SOUS and see what the other designers have prepared to share with you.  We have such a wide variety of styles in our group I am sure you won't be disappointed! 

Have a Blessed weekend!

Tuesday, November 1, 2011

Tutorial ~Rusty Butterflies~

Hi all!  I promised you a tutorial on my rusty butterfly, so here you go! This is what your finished product should look like.


 I used this butterfly on my latest page called "Lil Cowgirl".  I added some pearls for the body and a piece of Prima pearl flourish for the trail!


 Supplies needed: white die cut butterfly,[I used my Martha Stewart punch] Vintage Photo distress stain/ink, Aged Mahogany Distress Embossing Powder, Distress Embossing Ink, tray or paper, tweezers, heat resistant mat, and heat gun.


Apply a light to medium coat of the Vintage Photo to your butterflies.


Cover the butterflies first with the Embossing Ink, then place in the tray and cover generously with the Embossing powder.  Make sure you shake the Distress embossing powder first to distribute the release crystals evenly before you apply to the butterflies.


lightly tap off the excess embossing powder from the butterflies. Hold the butterfly with your tweezers so you don't burn yourself.  Heat the embossing powder till it darkens and takes on a very light sheen.  You can't burn this stuff, so don't be scared to heat it good!


 Let the butterfly cool and then with your finger gently rub the butterfly to release the crystals that are supposed to be removed, giving it that distressed look.


If you want, you can add more Vintage Photo on top of the distress powder.  I did for these particular butterflies as I felt I hadn't put enough the first time.  There you go!  You now have Rusty Butterflies!!  I really like how the Aged Mahogany Distress Powder gives it a deeper, richer color!


Let me know if you use this technique as I would love to see you use it! Obviously it works for much more than butterflies.  I see it being used for keys, locks, hinges and even flowers!  Thanks for stopping by!
  Hugs,

Monday, October 31, 2011

Face lift

I know, its about time, isn't it?  I've been visiting so many blogs that have been up lifted with a new look that I decided to take the plunge and give mine a new look.  Not exactly sure if it will be staying like this, but for now it will do!  What do you think?

test

Friday, October 28, 2011

Lil Cowgirl ~Stuck on U Sketches!~

 Its Friday once again, and better yet, its Reveal Friday over at Stuck on U Sketches!  I always get excited when it gets close to reveal day, as I just love sharing with everyone the great sketches we get the privilege to work with!  I also love to share any new things and new ideas! This weeks sketch is brought to us again by our very own Leah!  Being the time of year that it is, the sketch is based on Halloween, but it isn't a holiday that I celebrate so I decided to keep on my theme of my Great Nieces! (in case you were wondering)


I got some papers from Creative Imaginations, not really realizing they where a horse theme, and wasn't sure how I would use them.  Then I came across this photo of GN Austin who is ga-ga over horses! Perfect match!!  For a while I had wanted to use a photo and cut it up  as I did above. I think it looks real neat.  I used a Prima 12x12 mask with distress ink.


                                                   Here is the sketch created by Leah.                


 I was at a weekend crop this last weekend at Love is in the Details, my LSS, and Lori had put up a Dollar store for us, on location.  She had some pretty sweet items there, and the white doily behind the butterfly is just one of them!

I used die cuts from Tim Holtz's Tatered Floral die and inked it with Weathered wood distress inks and put this flower together.  I used a Dusty Attic doily and painted it with white distress crackle paint and inked the edges.  This cool rusted birdhouse and flower button are just a couple more items I got from the LIITD's Dollar store!


 I used Tim Holtz's barbed wire mask with distress ink and then outlined it with black and highlighted it with a white pen.  I also water distressed the edges of the strip of paper that is horizontal.

I used my Heartfelt Creations Swirly leaves stamp set to create the leaves, which I then inked with various green distress inks, and distress stickles.  Once it was dry [ yeah! for my heat gun!] I scrunched them a bit.

The pearl flourish I have cut up into 2 pieces and used on this layout are from Prima.  I love the 2 toned colors and the glittered flowers on this flourish!


I hope you all have a great weekend and stay safe!  Thanks for stopping in for a look see and please check out SOUS and see what the other designers have created for you.  Don't forget to give the sketch a go and increase your chance of winning some awesome goodies!


NOTE: stay tuned for a future tutorial on the rusted butterflies I made for this layout!