Monday, August 11, 2014

Scraps of Elegance Guest Designing for Scrap Around The World!


What an exciting day! Today is the reveal of the August 2014 Challenge 16 Mood Board for Scrap Around The World, and it was designed by the lovely Marilyn Rivera! Here is the link to their challenge:
http://scraparoundtheworld.blogspot.gr/2014/08/august-2014-challenge-16-elegant.html

 Isn't it just beautiful? So many different items to inspire you! I just love the whole board! This is actually my first time using a mood board so it was quite fun for me!


Now I will tell you what from the mood board inspired me! Quite a lot actually! I was first inspired by the aqua color of the dress in the top left corner.  I was also inspired by the cork board and the spools of thread, and the gold dress. Below is my creation and detailed photos, I will warn you, this post is quite photo heavy!


I decided to make a reverse canvas/layout, something I've wanted to do for quite some time but just didn't have the right challenge for it......till now!  I used the SOE August kit, Chasing Rabbits, and had saved this paper particularly for this challenge. I did lots of fussy cutting, and I used the Main Kit and the flower add on.
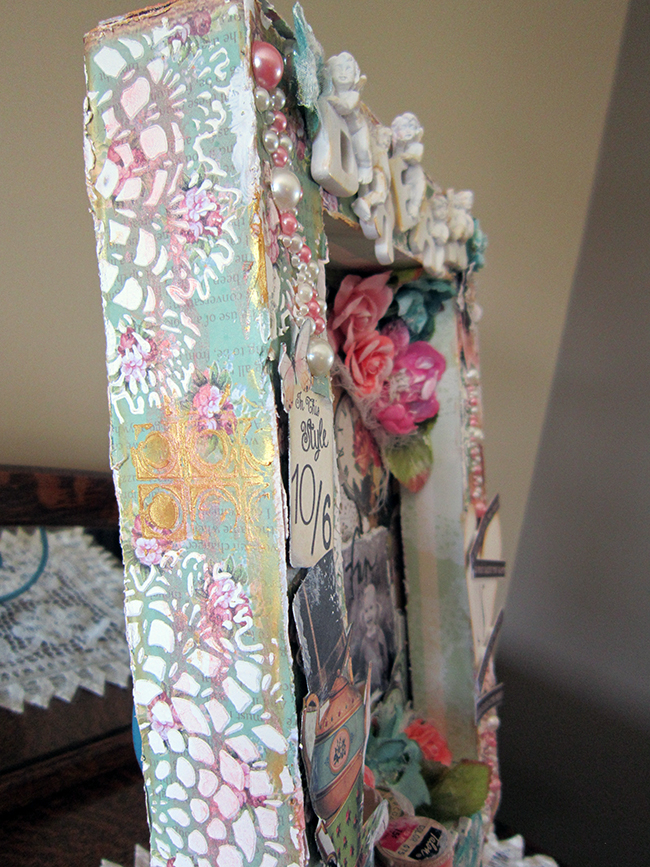

 Here is a view of the side and all the details. I used a couple of stencils, and used some homemade modeling paste and some Viva Decor Inka Gold, to bring in the gold from the mood board.  I also used some Lindy Stamp Gang spray in pink. You get to see some good dimension from this view!


 I used the pretty paper from the kit to line all edges of the canvas, and used a 12 x 12 sheet of cork to cover the back. I used lots of flowers from the add on and from my stash. I used the Inka gold on the Prima resin letters to give more definition.

 I love these vintage spools of thread that a friends daughter gave me from a garage sale she went too! Perfect for the mood board! I dry brushed gesso over most areas of this GDT piece.


I have lots of pretty layers under the photo, unfortunately they got covered by the all the layers.... you can see a few poking out on the right side of the photo. 


thanks so much for stopping by, I hope you enjoyed my piece for the SATW August mood board! Don't for get to go to their site to see all the other GDT creations!  Here is the link to their blog once again!

Be Blessed!

Friday, August 1, 2014

Raindrops on Roses Kit-August 2014 ~Scraps of Elegance Kits!

It's time to reveal the gorgeous August Kit from Scraps of Elegance Kits! this kit features papers from  Authentique, Petaloo flowers, Chipboard from Blue Fern Studios, and lots of Prima yuminess! 

Stay tuned for gorgeous designs from the design team!


Tuesday, July 22, 2014

Fabulous with SOE July kit 'Chasing Rabbits'

Today I want to share with you my second layout I created with Scraps of Elegance July kit "Chasing Rabbits. I really love the floral papers in this kit and all the cute clocks. This layout is featuring my favourite sisters to scrap, Cassidy and Lucia! They are so cute, and I am sure you can tell why I love to scrapbook them so much!

For this layout, I kept the mixed media to a minimum, using only one stencil and some homemade texture paste. I felt the words described the girls quite well! I did lots of edge distressing, some paper ripping and inked the edges as well.


On this close up you can see the Blue Fern Studio double frame that I altered. I first primed everything with gesso. And then on the top part I used Liquid Pearls to create raised flourishes and designs following the pattern of the frame. Unfortunately, after it dried it flattened out much more than I would of liked, losing most of the detail! I then embossed it with a Shabby Chic ivory embossing enamel and used black distress ink on the outer edges. The large clock is from a die that I own and I used Inka Gold, distress inks in brown shades,  with a few splatters of black and white sprays.


I did a little ripping on this side of the layout and I added a bit of lace to bring attention to this area. I used the cool word stickers from Heidi Swapp that was part of the main kit. I wanted it to sit on top of the frame so I just fussy cut it right on the acetate it was stuck onto to keep it stiff, and the. Just glued it on.


I fussy cut out some clocks and some flowers and used these as the base for this cluster at the top of the page. I added a few flowers from my stash and a cute resin frame.


Here you can see a close up of my main flower cluster using flowers from the Floral add on and from my stash. I used one of my MS butterfly punches and added them in a few stragic places on the layout. Finally, I dry brushed all the flowers with Gesso, and along the outer edges I used more Inka Gold and gesso for definition.

Thanks so much for stopping by my blog, and I hope you gained some insight on how I like to add character to some of my layouts, some inspiration, and I hope you will leave a few kind words of encouragement!

                    Be Blessed!

Bonnie 

Monday, July 14, 2014

Guest Designing for Something Tattered Stamps!


Hi! today I am guest designing for Something Tattered Stamps, and I wanted to share with you what I made with their beautiful stamps! The stamps are so delicate and elegant and perfect for a wedding project, so I decided to make a Wedding Card Box! This is actually something very practical for me to make, as my son is getting married this coming August!

  I bought a large round paper mache box from Michaels and  sprayed it white with Gesso in a spray can, as I didn't want the brown showing through. I then took a few sheets of white tissue paper and using black Archival ink and the Den Wallpaper Stamp, and stamped the image onto the tissue paper.  I wanted a softer image, so I used the palm of my hand instead of an acrylic block, to hold the stamp. I was really pleased with the result.

I then  carefully glued the tissue paper to the box with Modge Podge.  I then continued decorating the card box with sheer wired ribbon, white lace, various flowers that I had inked with purple inks and dry brushed with gesso, wooden hearts with chipboard words and a bit of bling!  Voila! There you have a beautiful Wedding Card Box any Bride would be proud to have on her Guest Book table! At least our Bride is!

Thank you to Something Tattered for having me and I hope you have been inspired to make your own card box, but most of all, to try out the beautiful stamps of Something Tattered.

Here is the result!


Thank you to Something Tattered for having me and I hope you have been inspired to make your own card box, but most of all, to try out the beautiful stamps of Something Tattered!  Thank you to everyone who has stopped by to take a peak and I hope you enjoyed my Wedding Card Box!

Be Blessed!

Bonnie


Friday, July 11, 2014

Scraps of Elegance 'Chasing Rabbits' kit & "He asked, She said YES!"

Hello! Happy Friday! I am so happy to finally be able to share with you my first DT project for SOE! I am totally in love with the gorgeous papers from this kit! There are papers from Marion Smith, Kiasercraft, and Websters Pages.
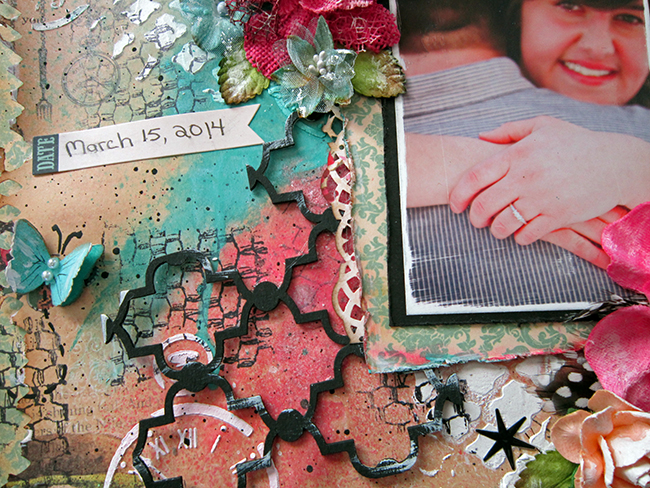
 I chose to use a engagement photo of my son and his fiancee. The photo is intentionally fuzzy as the focus is to be more on her hand and the engagement ring.  I knew this chipboard title I had in my stash would be perfect for this photo!  First I went to town on the papers that I chose.  I did some tearing and border punching, stenciling and misting and stamping! So messy and so much fun!

 Most of the flowers on this layout are from the Floral add on and a few from my stash.  I love to dry brush them with gesso, so I did that here as well as on the edges of all the papers and other embellishments.

 There are some really cute word stickers from Heidi Swap in the main kit and I used some of the stars from it, saving the gorgeous words for later projects to come.  The chipboard title is from my LSS and from a local business called Lasered Edge that is now designing for them. 

  In the main kit there is also some watercolor tags by Heidi Swap. I inked mine with chalk ink, stamped some swirls onto it with embossing ink and then used clear embossing powder to make the design pop but not too much.

I used some Blue Fern Studio chipboard, and painted it black and dry brushed it abit with gesso. I also used a date sticker from the kit to document the day the kids had their engagement photos taken.

Thanks for stopping by, and I hope you enjoyed my debut layout as much as I enjoyed creating it!

Be Blessed!

Monday, June 30, 2014

Exciting News!

Finally, at last I can share my exciting news that I have been holding in for what seems like forever!  As of July 1/14 I will be designing for Scraps of Elegance! I can't wait for my first kit to arrive so I can start creating with the yummy goodness that is within! I hope you all will continue to drop in and follow my journey as I strive to be an inspiration to all who stop by! Stay tuned!


Wednesday, June 4, 2014

June kit from C'est Magnifique and fond farwells


Hi all! It's time to share with you all what I have created with the June Kit from C'est Magnifique Kits!. It's been a bitter-sweet month for me both personally and creatively, with saying good bye to my Mother-in-law and working with this amazing kit which is my final kit for C'est Magnifique. I have so enjoyed designing for CM but it seems we are both going forward in new ways!  I want to thank Leslie for taking a chance on me and I want to wish Deonna all the best as she takes over C'est Magnifique Kits!

Now for my projects!  My first project I want to share with you is called "Moments" This kit has so many wonderful elements to choose from I put a little of everything on this layout! Here is little Lucia, who is stunning in her pink flower headband!  I did alot of mixed media type techniques from stamping to stenciling with home made modeling paste, to distressing and using paints and gelatos. I even took threads off the brown burlap trim and used them around the little roses on the outer edge of my layout! Such fun!

 To create this layout I used the Main Kit, the flower add on, the embellishment add on and the MMM Kit. From my stash I used: stencil, home made modeling paste,gesso, stamp, archival ink,string, leaves.

Close  ups:


This layout is in memory of my loving Mother-in-law who passed away May 16/14 and now rests in the loving arms of Jesus.  "Mother".  This photo is of my MIL and my dear hubby, taken almost 3 yrs ago at our daughters wedding, and she had just celebrated her 90th birthday. She always had this smile and light in her eyes when she talked with any of her children,  grandchildren and great grand children. She is fondly remembered and sadly missed. I wanted to keep this layout C&S, which is not really may style at all, but suits Mom.

I used papers from 7 Dots from the Main kit and got out my Martha Stewart punches and punched away! I very lightly inked the edges just to define them a bit more. I used lots of flowers and the cute Prima doily stichers. I altered the Blue Fern Calligraphic Border with distress paints in the metallics and teal chalk ink by Prima.

 To create this layout I used the Main kit, the flower add on, and the embellishment add on. From my stash I used: distress paint and inks, border punches, clock die, Inka Gold, and teal chalk ink.

Close ups:


Time for some fun! I bought this wooden plaque from Michael's some time ago with just this kind of project in mind!  I call it "She Knew". I made good use of the MMM kit for this one! Lots of paint and sprays and rub on's and gleatos! 


 To create this project I used the main kit, the flower add on, the embellishment add on and the MM Kit. From my stash I used: gleatos, mists, stencil, home made modeling paste,doll stamp and archival ink.

Close ups:


For my last but not least layout I have "Brotherly Love" to share with you. Jacob just loves his little brother Seth sooo much! When I saw this paper from the Kiasercraft papers that came in the June kit, I knew I would be using this photo with it! I had such fun using the turquoise paint from the MMM kit to make those yummy paint drip at the bottom of the layout. I painted the Blue Fern chippies black, and I made black dashes along each letter in the banner part of the title. 

 To create this layout I used the Main kit, the flower add on, and embellishment add on and the MM kit. From my stash: memory box die, stencils, home made modeling paste, mists, black paint and pen and cardstock,, wire string, leaves.

Close ups:

Thanks so much for stopping by, I hope you gained some inspiration on different ways to use this glorious kit!
I have some great scrappy news to share with you in a couple of weeks, so please stay tuned! 

Be Blessed!